(440) 307-2060
How to Install an Adjustable Roof Bracket for Roofing Shingle Jobs
By S&K Construction and Remodeling LLC | Roofing Experts in Jefferson, Youngstown & All Across Northeast Ohio
When you’re working on a pitched roof—especially in places like Jefferson, Chardon, or Youngstown, Ohio—safety and efficiency matter. Whether you’re repairing storm damage, installing new shingles, or doing a full roof replacement, one of the most essential tools in your roofing setup is the adjustable roof bracket.
These handy devices—also known as roof jacks—are critical for creating a secure working platform on sloped roofs. They allow roofers to safely walk, stand, or set down tools without sliding off. If you’re in the roofing business or even a DIY homeowner tackling a serious roofing shingle job, understanding how to properly install and use adjustable roof brackets is crucial.
As one of the top-rated roofing and siding contractors in Northeast Ohio, S&K Construction and Remodeling LLC is here to walk you through a detailed, step-by-step guide on how to install adjustable roof brackets and use them effectively.
What is an Adjustable Roof Bracket?
An adjustable roof bracket is a temporary metal support system that attaches to the roof’s deck and provides a flat surface to support scaffolding planks or walk boards. They are designed to fit different roof pitches (like 6/12, 8/12, 10/12, etc.) and are typically made from durable steel or aluminum.
Why You Need One:
- To prevent slipping and falls
- To create a stable surface to work from
- To hold materials and tools safely
- To comply with OSHA safety standards
Whether you’re re-roofing a home in Willoughby, Lyndhurst, or Medina, roof brackets can make your project safer and faster.
Tools & Materials Needed for Installation
Before you begin your adjustable roof bracket setup, gather the following tools and materials:
Required Tools:
- Hammer or drill with appropriate bits
- Measuring tape
- Chalk line
- Level
- Roofing nails or lag screws
- Safety harness and rope
- Adjustable roof brackets (rated for the pitch you’re working with)
- Planks (2×10 or 2×12 scaffold-grade boards)
🎯 Safety Reminder: At S&K Construction and Remodeling LLC, our crew never works without fall protection. If you’re working on any roof in places like Cleveland Heights, Euclid, or Concord, always wear a harness and use an anchor system.
Step-by-Step Guide to Installing Adjustable Roof Brackets
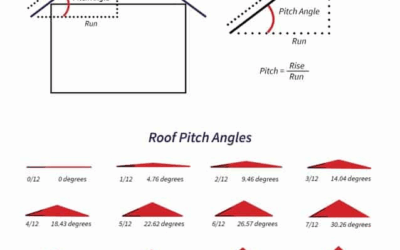
Step 1: Assess the Roof Pitch
Before selecting a bracket, measure your roof’s pitch. You’ll need a level and a tape measure:
- Place the level horizontally on the roof surface.
- Measure 12 inches along the level from one end.
- At the 12-inch mark, measure vertically from the roof surface to the level’s underside.
- The vertical number is the rise (e.g., 6 inches rise over 12 inches run = 6/12 pitch).
Choose brackets that match or are adjustable to the specific pitch.
Step 2: Mark the Bracket Locations
Use a chalk line to mark where each bracket will go.
- Start from the lowest point of the roof you’re working on.
- Mark bracket placements every 4 to 6 feet, depending on your scaffold plank length.
- Ensure your chalk line is level and matches where you’ll set the walk boards.
📍 We often follow this technique on projects in Twinsburg, Walton Hills, and Beachwood, especially on steep-pitched roofs.
Step 3: Install the First Bracket
- Position the roof bracket so its back plate sits flat on the decking.
- Align the bracket with the chalk line.
- Nail or screw the bracket into a rafter or truss, not just the decking. Use at least three roofing nails or lag screws for a firm grip.
- Set the angle to match your roof pitch using the adjustable settings.
- Use a level to ensure the top edge is flat.
🔨 Pro Tip: If you’re working on a tear-off roof, you may need to lift the shingles slightly to secure the bracket base directly to the deck.
Step 4: Add Additional Brackets
- Repeat the installation process every 4 to 6 feet along the chalk line.
- For roofs longer than one plank, stagger additional brackets vertically for ladder-like scaffold levels.
- For added stability, double-check fasteners on each bracket before use.
💡 In high-wind areas like Madison or Kirtland Hills, we recommend using lag screws over nails for extra holding power.
Step 5: Set the Planks
Once your brackets are installed:
- Lay your scaffold-grade boards (typically 2×10 or 2×12 planks) across the brackets.
- Ensure the planks are evenly distributed and fully supported.
- Check that no board overhangs a bracket by more than 12 inches.
- Secure planks to brackets using nails or screws if required.
💬 OSHA requires boards to be cleated or secured to prevent movement. We follow this protocol on every jobsite in Ashtabula County and beyond.
Step 6: Install Guardrails (If Needed)
For extra protection—especially on steep roofs or multi-level homes—install temporary guardrails:
- Use upright posts attached to the brackets or planks.
- Add horizontal rails about 21 inches and 42 inches above the plank level.
- Consider adding toe boards to prevent tools from sliding off.
🏡 We use this method on complex roofing jobs in Gates Mills, Chagrin Falls, and Pepper Pike, where safety and precision matter most.
Step 7: Remove the Brackets Safely
When your roofing job is complete:
- Carefully remove planks.
- Use a flat bar to extract nails or unscrew lag bolts.
- Patch and seal all fastener holes with roofing cement or new shingles if needed.
- Inspect for any damage to the roof deck or shingles.
🧰 Our cleanup process includes a full roof walk-through to ensure no damage remains—standard practice for all S&K roofing projects in Cleveland, Lakewood, and surrounding areas.
FAQs About Roof Bracket Installation
1. Do I need roof brackets for every roof job?
If you’re working on a roof pitch above 4/12, roof brackets are highly recommended. For steeper roofs, they’re a must for safety.
2. Can I reuse roof brackets?
Yes, if they’re not bent or rusted. Always inspect brackets before reuse. At S&K, we routinely check equipment between jobs.
3. What kind of planks should I use?
Use only scaffold-grade 2×10 or 2×12 boards. Avoid cracked or warped boards.
Safety First—Always
Working on roofs, especially in summer heat or after rain, can be dangerous. At S&K Construction and Remodeling LLC, we follow strict OSHA guidelines and best practices, including:
- Daily safety briefings
- Harness and anchor systems
- Heat stress prevention
- First-aid kits on-site
- Fall protection training
Whether we’re handling a large roof replacement in Mayfield Heights or a small repair in Lyndhurst, safety is non-negotiable.
Why S&K Construction and Remodeling LLC?
We’re not just another roofing company. We’re your neighbors. From Youngstown to Jefferson, we’ve built a reputation for quality craftsmanship, honest pricing, and outstanding customer care.
What Sets Us Apart:
- Owens Corning Preferred Contractor
- 5-star reviews across Google and Facebook
- Expert in roofing, siding, gutters, windows, decks, and more
- Full-service company with financing available
- Locally owned and operated
🛠 When it comes to installing roofing safely, we don’t cut corners—we build them strong.
Roofing in Northeast Ohio? Call the Experts.
If you’re planning a roofing shingle job in Ashtabula County, Lake County, or the greater Northeast Ohio region, don’t take chances with safety. Whether you’re a DIYer or a homeowner looking for expert help, S&K Construction and Remodeling LLC is here to assist.
📞 Call now for a FREE estimate
🌐 www.skroofingandconstruction.com
📍 Serving: Jefferson, Youngstown, Chardon, Cleveland, Twinsburg, Euclid, and beyond
💬 Ask us about our financing options for roofing, siding, and more!
Final Thoughts
Installing adjustable roof brackets may seem like a small detail, but it’s a vital part of any successful roofing project. Done right, they offer safety, stability, and peace of mind—especially on steep slopes common in homes across Northeast Ohio.
If you’re not comfortable doing it yourself, trust the experts at S&K Construction and Remodeling LLC. We combine safety with skill, so your home gets the quality it deserves—with zero shortcuts.