 (440) 307-2060
Ice And Water Shield Installation Instructions
When protecting your roof from leaks, moisture damage, and ice dams, following proper ice and water shield installation instructions is essential. This self-adhesive underlayment serves as a waterproof barrier that prevents water from penetrating beneath your shingles, especially in areas prone to ice buildup or wind-driven rain. Whether you’re a homeowner planning a DIY installation or working with a roofing contractor, understanding each step of the process ensures your roof remains durable, watertight, and ready for harsh weather.
What Is Ice and Water Shield?
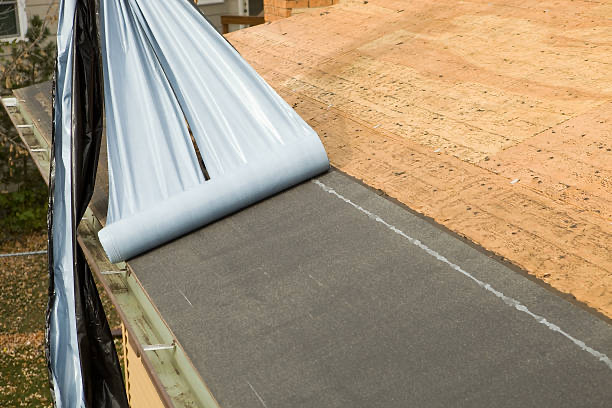
An ice and water shield is a self-sealing membrane made from rubberized asphalt. It’s installed underneath shingles or other roofing materials to create an extra layer of protection. This product is most commonly applied along roof eaves, valleys, and penetrations—essentially anywhere water tends to accumulate or leak through.
While standard underlayment (see: roof underlayment for shingles) provides basic moisture resistance, ice and water shield delivers superior sealing performance. Its adhesive backing tightly bonds to the roof deck, sealing around nail holes and preventing leaks caused by ice dams or wind-driven rain.
Why Ice and Water Shield Is Important
Ice dams form when heat from your attic melts snow on the roof. The water runs down to the colder eaves, refreezes, and creates a blockage. As the ice builds up, melted water gets trapped behind it and can seep beneath the shingles, soaking the roof deck and insulation.
By following proper ice and water shield installation instructions, you form a continuous waterproof barrier that stops melted snow or rain from infiltrating your roof. It’s a small investment that can prevent major damage to your home’s structure and interior.
If you live in a northern region, you might also want to review (cold roof ventilation requirements) and (1/150 attic ventilation requirement) to understand how insulation and airflow help prevent ice damming in the first place.
Tools and Materials Needed
Before beginning, gather all the necessary materials and tools for a smooth and safe installation:
Materials:
- Ice and water shield rolls
- Roofing nails or staples
- Drip edge flashing
- Roofing shingles or other top material
Tools:
- Utility knife or roofing blade
- Measuring tape
- Chalk line
- Roofing hammer or nail gun
- Safety harness (for steep roofs)
- Ladder and roof brackets
For older roofs, ensure the existing shingles and underlayment are removed. You can check out (roof tear off) for tips on safe and efficient removal before installation.
Where to Install Ice and Water Shield
Ice and water shield should be applied in specific areas where leaks are most likely to occur. These include:
- Eaves and Overhangs – The first 24 inches inside the heated wall line should always be covered. In colder climates, extend coverage to 36 inches or more.
- Roof Valleys – These are prime areas for water accumulation. Always apply a full-width strip of shield along the valley before laying shingles.
- Ridge and Hip Lines – Use in areas where roof sections meet.
- Around Penetrations – Install around vents, chimneys, and skylights for a watertight seal (see: skylight repair or replace).
- Low-Slope Areas – Flat or low-pitch roofs benefit greatly from full coverage to prevent ponding and seepage (related: flat roof systems).
Surface Preparation
Before laying down any material, make sure your roof deck is clean, dry, and free from debris or protruding nails. The adhesive won’t properly bond to dusty or damp surfaces.
- Inspect the Deck – Replace damaged or rotted plywood.
- Dry the Surface – Moisture or frost will prevent adhesion.
- Sweep the Deck – Remove sawdust, leaves, or shingle granules.
If your roof was recently installed or repaired, refer to (roof installation cost) for insights on what new roof preparation might involve.
Step-by-Step Ice and Water Shield Installation Instructions
Step 1: Apply Drip Edge Along the Eaves
Start with the drip edge flashing at the bottom of the roof. Install it under the ice and water shield at the eaves. This ensures water flows over the flashing rather than behind it. Nail it securely, spacing nails about every 10 inches.
Step 2: Measure and Cut the Ice and Water Shield
Measure the area along the eave to determine the length of the first course. Cut the membrane with a sharp utility knife. Be careful not to stretch it during cutting—it can cause wrinkles that lead to leaks.
Step 3: Align and Peel the Backing
Position the roll along the eaves, keeping it straight and flush with the drip edge. Peel back a few feet of the release film at a time while pressing the membrane into place. Work slowly and steadily—once the adhesive sticks, repositioning is difficult.
For long sections, it helps to have a second person assist with alignment to prevent wrinkling or overlapping errors.
Step 4: Press and Smooth
Once the membrane is in place, press it firmly with your hands or a heavy roller. The goal is to create an airtight bond with the roof deck. Pay attention to corners, ridges, and valleys, as these areas often require extra pressure for a secure seal.
Step 5: Overlap Successive Courses
Each new strip of ice and water shield should overlap the previous one by at least 3 inches horizontally and 6 inches vertically. The overlaps should be clean, tight, and free from debris.
When working in valleys, install the shield lengthwise, centered along the valley line, extending at least 18 inches on each side. Smooth it down firmly to prevent air pockets.
Step 6: Seal Around Roof Penetrations
Use small pre-cut pieces of shield around chimneys, vent pipes, and skylights. Cut the material so it extends several inches beyond the base of each penetration. Smooth it tightly to eliminate wrinkles and ensure full adhesion.
These areas are prone to leaks and often require additional flashing. You can reference (roof leak repair) for identifying potential weak spots around penetrations.
Step 7: Install Drip Edge on the Rakes
Once the membrane is installed along the eaves, add drip edge flashing along the rake edges (gables). This time, place it over the ice and water shield to channel runoff away from the roof’s edge. Secure with roofing nails.
Step 8: Apply Secondary Underlayment (Optional)
If desired, cover the remaining roof deck with a synthetic underlayment or felt paper. This adds an extra layer of protection and prepares the surface for shingle installation. Some roofers apply ice and water shield to the entire roof deck, especially on low-slope roofs (see: low pitch roof tiles).
Step 9: Begin Shingle Installation
Once the underlayment is complete, you can start installing shingles or your chosen roofing material. Always follow the manufacturer’s shingle installation instructions and maintain proper nailing patterns.
The ice and water shield underneath will automatically self-seal around nails, preventing water from seeping through.
Common Mistakes to Avoid
- Skipping Eaves or Valleys: These are the most vulnerable areas for leaks.
- Applying Over a Dirty Surface: Adhesion will fail if the deck isn’t clean and dry.
- Incorrect Overlaps: Too little overlap can allow water to penetrate seams.
- Not Rolling Properly: Air pockets or wrinkles can compromise the seal.
- Using in Extreme Cold: Cold temperatures make the material stiff and difficult to handle.
To better understand roofing safety and prep, check (roof care) for ongoing maintenance practices that can extend the life of your system.
Cold Weather Application Tips
When installing in cold climates, store rolls indoors until just before use. The adhesive performs best above 40°F (4°C). If temperatures are lower, use a heat gun or warm day sunlight to make the membrane more pliable.
In extremely cold regions, consider doubling up on coverage at eaves and valleys for extra security. Proper attic insulation and ventilation also prevent ice dams—refer again to (cold roof ventilation requirements) for a full explanation.
How Much Ice and Water Shield Do You Need?
Most rolls cover about 67 square feet (2 squares). To calculate how much material you need:
- Measure your eave length and multiply by 3 feet for each course.
- Add additional coverage for valleys, penetrations, and low-slope areas.
- Include waste and overlap in your total estimate (usually 10–15% extra).
If you’re comparing costs between materials, (roof installation cost) and (roof materials list) can help you evaluate your total project budget.
Maintenance and Inspection
Although ice and water shield is long-lasting, it’s important to inspect your roof periodically to ensure it’s performing properly.
- Check for shingle damage or curling above shielded areas.
- Look for signs of leaks in the attic after heavy rain or snow.
- Keep gutters clear to prevent water backup.
- Reapply or replace damaged sections during major roof repairs.
If you suspect a problem, don’t wait—(roof leak repair) offers guidance on early signs of damage and when to call a professional.
When to Replace Ice and Water Shield
While the membrane itself can last for decades, replacement may be necessary if:
- You’re doing a full roof replacement.
- The old shield was damaged during tear-off.
- It has lost adhesion or cracked over time.
During replacement projects, many contractors choose to upgrade to modern versions that offer stronger adhesion, UV resistance, and better sealing around nails.
Final Thoughts
Properly following ice and water shield installation instructions ensures your roof is protected against leaks, ice dams, and harsh weather for years to come. This self-sealing barrier is a small step that makes a big difference—especially in regions with freezing winters or heavy rainfall.
By understanding where and how to install it, maintaining good ventilation, and keeping your roof clean, you can significantly extend your roof’s lifespan. For anyone investing in roof protection, an ice and water shield isn’t just an option—it’s essential peace of mind. 440-235-3124


