 (440) 307-2060
Rake on Roof: A Complete Homeowner’s Guide
When people hear the term rake on roof, they sometimes picture a garden rake sitting on top of shingles. But in roofing, the rake has nothing to do with lawn tools. Instead, it refers to the sloped edges of a gable-style roof that run from the eave (the bottom edge) up to the ridge (the top peak). Understanding the rake is important because it impacts roof design, weather protection, and overall curb appeal. Whether you’re replacing your roof, building a new home, or just curious about the terminology, learning about rakes will help you understand how your roof system works.
This guide covers everything you need to know about the rake on a roof—what it is, why it matters, how it’s built, and the different styles homeowners can choose. We’ll also discuss installation details, maintenance tips, and how the rake contributes to both function and aesthetics.
1. What Is a Rake on Roof?
The rake is the inclined edge of a gable roof that extends from the eave to the ridge. If you stand at the side of a home with a triangular gable end, the sloped line running along the roof’s edge is the rake.
Key points:
- It’s only present on gable-style roofs (or variations with gables).
- It’s different from the eaves, which are the horizontal edges at the bottom of the slope.
- The rake can be left open, finished with trim, or covered with overhangs depending on design preferences.
Think of the rake as the “frame” for the side of your roof—it gives the structure definition while also playing a protective role.
2. Functional Purpose of the Rake
The rake isn’t just for looks; it has several important jobs:
- Weather Protection: Helps shield siding and roof edges from wind-driven rain and snow.
- Ventilation Potential: Some rake overhangs incorporate vents.
- Aesthetic Framing: Defines the roofline, contributing to a home’s curb appeal.
- Transition Point: Provides a secure edge where roofing materials meet trim or fascia.
Without a properly finished rake, your home would be more vulnerable to moisture infiltration and wind damage.
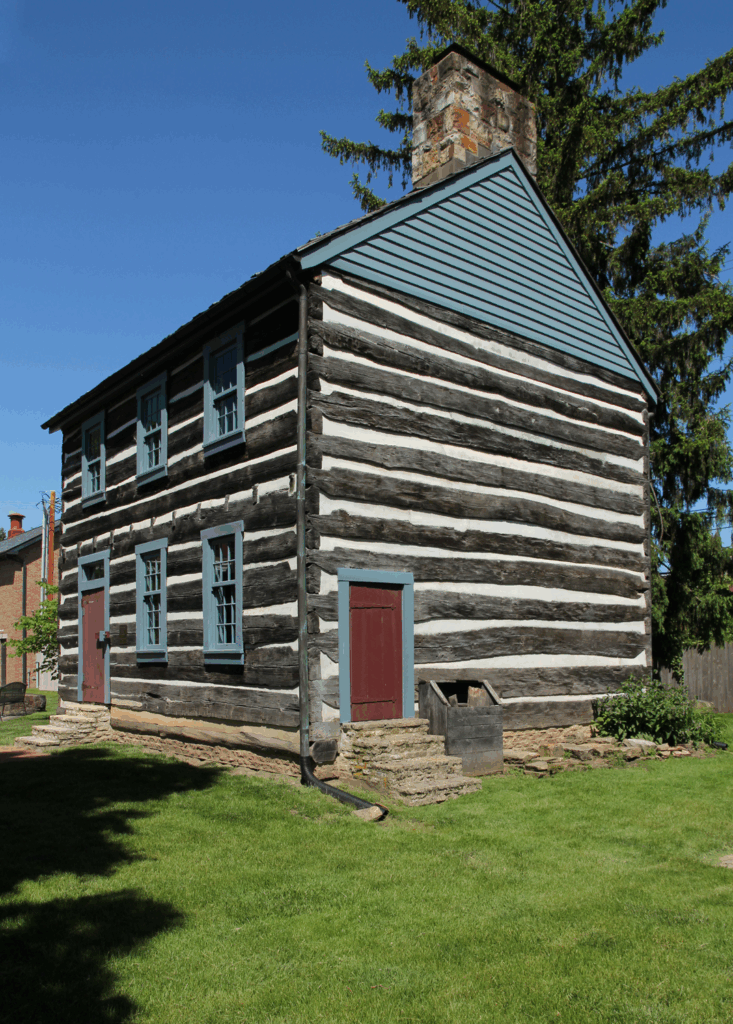
3. Different Styles of Rakes on Roofs
Not all rakes look the same. Homeowners and builders have options depending on style, budget, and local weather.
A. Overhanging Rake
- Extends beyond the siding of the house.
- Often finished with soffit material or trim.
- Provides extra protection to siding by directing water further away.
- Popular in regions with heavy rainfall or snow.
B. Flush Rake
- Lies flat against the gable end with no overhang.
- Sleeker appearance, often used in modern or minimalist designs.
- Provides less protection from water and wind than overhanging designs.
C. Decorative Rake

- Adds ornamental details like brackets or carved trim.
- Often found in historic or craftsman-style homes.
- Balances function with a strong design statement.
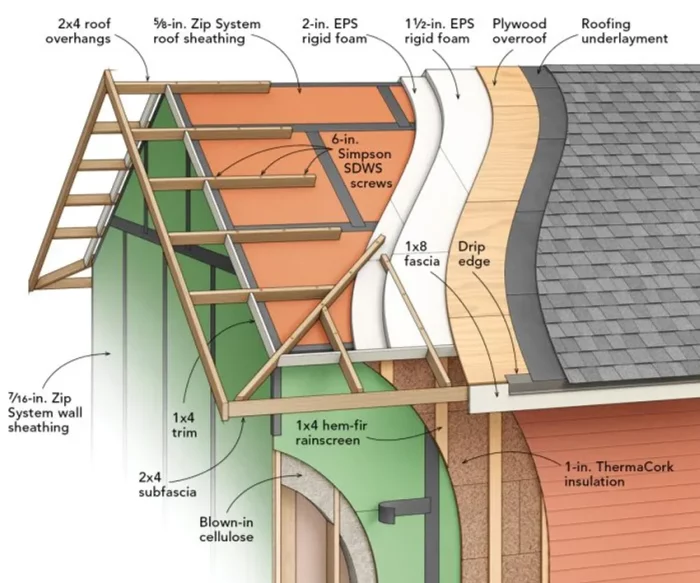
4. Rake Boards and Their Role
The rake board is the trim installed along the rake edge. It serves both functional and aesthetic purposes.
- Protective: Shields the exposed edge of roofing materials.
- Supportive: Provides a surface to attach gutters or fascia where needed.
- Decorative: Adds definition and style to the roofline.
Rake boards are typically made of wood, PVC, or composite material. Choosing the right board ensures durability and complements the rest of the home’s exterior.
5. Rake vs. Eave: Knowing the Difference
Homeowners sometimes confuse the rake with the eave. Here’s the distinction:
- Rake: The sloping edge at the gable side.
- Eave: The horizontal bottom edge of the roof where water typically drains into gutters.
Understanding this difference helps when discussing roofing details with contractors or reviewing blueprints.
6. Common Materials Used for Rakes
Rakes can be finished in a variety of materials, depending on budget and design:
- Wood Trim: Traditional and customizable but requires regular maintenance.
- PVC or Vinyl: Low-maintenance and durable against moisture.
- Fiber Cement: Offers durability and can be painted.
- Aluminum Wraps: Metal cladding often used for maximum protection with minimal upkeep.
Each option has pros and cons in terms of cost, lifespan, and appearance.
7. Construction of a Roof Rake
Building a rake involves more than attaching trim. Here’s the general process:
- Framing: Rafters extend to form the gable edge.
- Decking: Roof sheathing (plywood or OSB) is applied to the rafters.
- Underlayment: Protective barrier laid across the deck.
- Trim Installation: Rake boards or fascia are secured to cover edges.
- Roofing Material: Shingles or panels are installed, overlapping onto the rake edge.
- Flashing (if needed): Metal strips added for waterproofing.
This combination ensures that the rake is both structurally sound and weather-resistant.
8. Aesthetic Importance of the Rake
Beyond function, the rake is an essential architectural detail. It frames the roofline, giving the house character.
- A flush rake emphasizes clean, modern lines.
- An overhanging rake creates a more traditional or protective look.
- Decorative rakes with trim or brackets enhance historic or craftsman designs.
Choosing the right rake design can significantly impact curb appeal.
9. Maintenance of Roof Rakes
Like all exterior elements, rakes require periodic attention. Common tasks include:
- Inspecting rake boards for rot, cracks, or peeling paint.
- Replacing or repainting damaged trim.
- Checking flashing to ensure watertight seals.
- Clearing away debris like leaves or bird nests.
Regular maintenance ensures the rake continues to protect and beautify the home.
10. Common Problems with Rakes
Some issues arise when rakes aren’t properly installed or maintained:
- Water Damage: Without flashing or proper trim, water can seep into walls.
- Warped or Rotting Boards: Wood rakes exposed to moisture deteriorate without upkeep.
- Pest Intrusion: Gaps along the rake can invite insects or birds.
- Wind Uplift: Overhanging rakes not properly secured may suffer in storms.
Catching these problems early prevents costly repairs later.
11. Rake Trim and Flashing
Trim and flashing are essential to a durable rake.
- Rake Trim: Decorative boards or molding that finish the edge.
- Rake Flashing (also called “drip edge”): Metal installed to guide water away from the roof and siding.
Together, these components make sure the rake looks polished and functions correctly in all weather conditions.
12. Regional Design Considerations
The style of rake you choose often depends on your climate:
- Snowy regions: Overhanging rakes help push snow and water away from siding.
- Windy areas: Flush rakes may be safer, as they offer less surface for wind to grab.
- Rain-heavy climates: Rake flashing becomes especially critical to prevent leaks.
Local building codes may also specify certain rake designs for safety.
13. Historical and Architectural Styles
Rakes have played a role in architecture for centuries.
- Victorian Homes: Often feature ornate decorative rakes with carved woodwork.
- Craftsman Style: Uses extended rakes with exposed brackets.
- Modern Minimalist Homes: Favor flush rakes with sleek finishes.
These variations show how something as simple as a roof edge can shape the personality of a home.
14. DIY vs. Professional Installation
Handy homeowners sometimes install rake boards themselves, but it’s often best left to professionals.
- DIY: Can save money but requires skill to ensure straight lines and watertight seals.
- Professional: Ensures proper flashing, alignment, and long-term durability.
Since the rake plays such an important role in roof performance, cutting corners can lead to water damage or structural issues.
15. Rake Overhang Depth
If you’re designing a new roof, you’ll need to decide how far the rake overhang extends beyond the siding.
- Short Overhang (6–12 inches): Sleek appearance, less weather protection.
- Medium Overhang (12–24 inches): Balanced look and function.
- Deep Overhang (24+ inches): Strong protection, common in craftsman and traditional designs.
The right depth balances appearance with local climate needs.
16. Ventilation at the Rake
Some homes use rake overhangs as a location for ventilation. Small vents or soffits at the rake can improve attic airflow, reducing heat buildup in summer and preventing moisture issues in winter.
17. Energy Efficiency Considerations
While the rake itself doesn’t directly save energy, proper construction prevents leaks and drafts that could undermine insulation. Combined with good roof ventilation, it contributes to an energy-efficient home.
18. Upgrading the Rake During a Roof Replacement
If you’re already replacing your roof, it’s the perfect time to upgrade the rake. Options include:
- Switching from flush to overhanging design.
- Adding decorative trim for a custom look.
- Upgrading to low-maintenance materials like PVC or aluminum.
- Installing new rake flashing to prevent leaks.
This is often a small additional cost compared to the overall roof but makes a big impact.
19. Cost of Rake Construction or Replacement
Costs vary depending on material and labor:
- Basic wood rake boards: $3–$6 per linear foot installed.
- PVC or composite boards: $6–$12 per linear foot.
- Decorative or custom designs: Higher depending on detail and craftsmanship.
Flashing, painting, and labor all add to the final cost.
20. Long-Term Value of a Well-Built Rake
A strong, well-finished rake doesn’t just look nice—it adds lasting value:
- Prevents water intrusion, saving thousands in future repairs.
- Boosts curb appeal for resale.
- Reduces maintenance if durable materials are chosen.
It’s a small piece of the roof system, but one with big benefits.
21. Case Study: Flush vs. Overhanging Rake
Consider two homes:
- Home A has a flush rake in a windy coastal area. The sleek design minimizes wind damage, but siding needs more frequent repainting from rain exposure.
- Home B has a 20-inch overhanging rake in a snowy climate. The siding stays dry, but the deep overhang requires extra bracing against heavy snow loads.
Both designs are correct for their climates, showing how rake style depends on local conditions.
22. Safety Considerations
Working on the rake edge of a roof can be dangerous. The sloped design and exposed edge increase the risk of falls. Always use safety harnesses, ladders, and professional help if unsure.
23. Rakes and Gutters
While eaves often carry gutters, rakes generally do not. Water naturally drains off eaves, while rakes shed water to the sides. However, flashing at the rake ensures water doesn’t seep into siding or under shingles.
24. Customizing the Look of Your Rake
Homeowners can personalize rakes with paint, stain, or decorative trim. Matching rake boards to shutters or fascia color creates a cohesive look. More elaborate homes may include corbels, brackets, or patterned woodwork for extra charm.
25. Conclusion: Why the Rake Matters
The rake on roof may not be the first feature you notice, but it plays a vital role in protecting your home and shaping its style. From preventing water damage to framing the architecture of your house, the rake is more than just an edge—it’s a functional and aesthetic feature that deserves attention.
Whether you choose a flush, overhanging, or decorative rake, investing in proper construction and maintenance ensures long-term durability and beauty. Next time you look at your roof, take a closer look at the rake—you’ll see just how much it contributes to the home’s overall character. 440-235-3124


