(440) 307-2060
Roof Leak Near Vent Pipe: Causes, Repair Methods, and Preventative Tips
A roof leak near a vent pipe can be one of the most frustrating and tricky problems a homeowner can encounter. The roof serves as the first line of defense against the elements, protecting your home from rain, snow, and debris. However, over time, wear and tear, environmental factors, and even simple installation mistakes can lead to leaks. When the leak occurs near a vent pipe, the issue can become more complex because it often involves both your roof and plumbing system.
In this comprehensive blog post, we’ll dive deep into the causes of roof leaks near vent pipes, how to identify and repair them, and offer valuable tips for preventing future leaks. Whether you’re a DIY enthusiast looking to handle the issue yourself or you’re seeking professional guidance, this guide will give you the insights you need.
What is a Roof Vent Pipe?
Before we dive into the issue of roof leaks near vent pipes, it’s important to understand the role of a vent pipe in your roof structure. A roof vent pipe, or plumbing vent pipe, is part of your home’s plumbing system. It allows gases and odors from your drainage system to escape outside, while also enabling fresh air to flow into the plumbing system to prevent vacuum pressure, which could disrupt the flow of water.
These pipes typically protrude through your roof and are covered with flashing and seals to prevent water from leaking around the pipe. While they are crucial for your plumbing system, they can also be vulnerable to leaks if not properly installed or maintained.
Common Causes of Roof Leaks Near Vent Pipes
Roof leaks near vent pipes are more common than you might think, and they can happen for several reasons. Understanding these causes is the first step in diagnosing and repairing the issue. Below are some of the most common causes:
1. Damaged or Missing Flashing
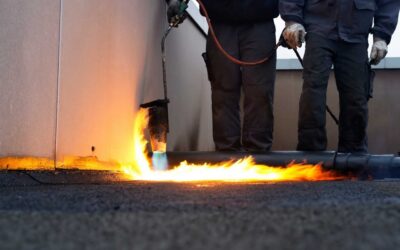
The flashing is a critical component of any vent pipe installation. Flashing is typically made of metal or rubber and is placed around the vent pipe where it exits the roof. It creates a barrier that prevents water from seeping into the space around the pipe. Over time, the flashing can deteriorate, crack, or become loose, allowing water to leak into the roof structure. Missing or improperly installed flashing is a leading cause of leaks near vent pipes.
2. Worn or Cracked Rubber Boot
Most vent pipes are sealed using a rubber boot, which is a flexible cover that fits around the base of the pipe where it exits the roof. This boot helps to create a watertight seal, but over time, it can become brittle or cracked due to sun exposure, age, or extreme weather. Once the rubber boot is compromised, water can easily seep under the roof, leading to leaks.
3. Poor Installation or Workmanship
If your roof was not installed properly in the first place, vent pipes might not have been sealed correctly. Inadequate sealing or flashing installation can result in water infiltration. If you recently had your roof replaced or repaired, poor workmanship could be the reason for your current leak near the vent pipe.
4. Improperly Sized Vent Pipes
If the vent pipe is too small for the system or was improperly installed, it could cause water to back up around the pipe. This situation can be exacerbated by heavy rain or snow, where water can seep around the edges of the pipe or underneath the flashing and cause damage.
5. Clogged or Blocked Roof Vent
If the vent pipe is blocked or clogged with debris, leaves, or bird nests, water may be forced to accumulate around the pipe and find ways to seep into your roof. This issue can cause water to back up around the base of the pipe, eventually resulting in a roof leak.
6. Temperature Fluctuations and Ice Dams
In colder climates, temperature fluctuations can lead to the formation of ice dams. Ice dams form when snow on your roof melts, and the water flows down toward the eaves. However, if the water refreezes near the vent pipe or at the edge of the roof, it can cause water to pool around the vent pipe, creating leaks. This issue is particularly common in homes with poorly insulated or ventilated attics.
7. Aging Roofing Materials
Roofing materials, such as asphalt shingles or tar, can deteriorate over time due to exposure to the elements. As these materials wear out, they become less effective at repelling water. The area around the vent pipe can become particularly vulnerable to leaks if the surrounding shingles are damaged or worn away.
Identifying a Roof Leak Near a Vent Pipe
Roof leaks near vent pipes may not always be immediately obvious. Often, the leak will show up as water damage inside the home, far from the actual source of the leak. Identifying a roof leak near a vent pipe requires a bit of detective work. Here’s how you can determine if the vent pipe is the source of the leak:
1. Water Stains on Ceilings or Walls
One of the most common signs of a roof leak is the appearance of water stains on the ceiling or walls of the room directly below the vent pipe. These stains are often brown or yellow and can be an indication of water seeping through the roof and into the home.
2. Dripping Water
If you notice water dripping from the ceiling or along the walls, especially after a rainstorm or snowmelt, this is a clear sign of a roof leak. In many cases, the leak will originate around the base of the vent pipe.
3. Mold or Mildew Growth
Roof leaks provide a perfect environment for mold and mildew to grow. If you see mold or mildew growth near the vent pipe or in the attic, it’s a strong indication that water has infiltrated through the roof.
4. Inspecting the Roof
To directly inspect the area around the vent pipe, you’ll need to safely climb onto your roof or hire a professional. Check for damaged or missing flashing around the base of the vent pipe. Inspect the rubber boot for cracks, tears, or signs of wear. You should also look for any signs of clogged vents or debris accumulation.
5. Use a Garden Hose
If you suspect the leak is around the vent pipe, you can use a garden hose to test for leaks. Have someone in the attic or inside the house and slowly spray water around the base of the vent pipe. If you see water dripping inside, you’ve likely found the leak’s source.
How to Fix a Roof Leak Near a Vent Pipe
Now that you know the potential causes of a roof leak near a vent pipe and how to identify it, let’s go over how to fix the problem. Repairing a roof leak near a vent pipe can be a DIY project if the issue is minor, but more extensive repairs may require professional assistance. Here’s a step-by-step guide to fixing the leak:
Materials You’ll Need:
- Replacement flashing
- Roofing cement or caulk
- Rubber boot (if necessary)
- Roofing nails
- Ladder
- Utility knife
- Work gloves
- Sealant or silicone (optional)
1. Inspect the Vent Pipe and Flashing
Before you begin any repair, carefully inspect the vent pipe and surrounding flashing. If you see that the flashing is loose, damaged, or missing, this will need to be replaced. Additionally, inspect the rubber boot for any cracks or damage.
2. Remove the Old Flashing or Boot
If the flashing or rubber boot is damaged, you will need to remove the old materials. Use a utility knife or roofing tool to carefully remove the damaged rubber boot or flashing. If the flashing is nailed in place, carefully pry it off.
3. Install New Flashing or Boot
Once the old flashing or boot is removed, replace it with a new one. If you’re using a rubber boot, slide it over the vent pipe and ensure it sits snugly against the roof. Secure the boot in place by nailing it down and applying roofing cement around the edges to ensure a watertight seal.
4. Apply Roofing Cement
Once the new flashing or boot is in place, apply roofing cement or caulk around the edges to seal any gaps. Pay special attention to the seams and areas where the flashing meets the roof material.
5. Inspect the Roof Shingles
After repairing the vent pipe area, check the surrounding roof shingles for any damage. If you find damaged or missing shingles, replace them to ensure the area is fully sealed and waterproof.
6. Test the Repair
Once the repair is complete, test it by spraying water around the area with a garden hose or waiting for the next rainfall. Ensure there are no leaks inside the house or in the attic.
Preventing Roof Leaks Near Vent Pipes
While repairing a roof leak near a vent pipe is essential, preventing future leaks is just as important. Here are some tips to help you avoid roof leaks around vent pipes:
1. Regular Roof Inspections
Conduct regular roof inspections, especially after heavy storms or extreme weather events. Look for signs of wear, missing shingles, or damaged flashing. Early detection of issues will help prevent leaks before they become major problems.
2. Replace Old Flashing or Boots
As roof materials age, they can become brittle or worn. Periodically inspect the flashing and rubber boot around your vent pipes, and replace them if they show signs of damage or wear.
3. Clear Debris from Roof Vents
Make sure your roof vents are free of debris, leaves, or nests. Clogged vents can cause water to back up around the vent pipe, increasing the risk of a leak.
4. Maintain Proper Attic Ventilation
Proper attic ventilation