Guide to Calculating Linear Feet in Roofing Projects
When it comes to roofing projects, whether you’re a homeowner, contractor, or roofing specialist, understanding how to calculate linear feet is an essential skill. It’s a key aspect of measuring and purchasing roofing materials, estimating costs, and ensuring that everything fits together properly. In this comprehensive guide, we’ll cover what linear feet are, how to measure them correctly, the tools you’ll need, how to calculate roofing materials in linear feet, and why accurate calculations are crucial for a successful roofing projectAccurate measurements are essential when preparing for a roof estimate.
What Is Linear Feet?
Linear feet (often abbreviated as “LF”) is a unit of measurement that refers to a one-dimensional length. It’s used to measure the length of an object or distance along a straight line, regardless of its width or thickness. For example, if you’re measuring the length of a roof edge, the length from one end of a ridge to the other, or the length of gutters or flashing, you’ll measure in linear feet.
Linear feet are important in roofing because many roofing materials, like shingles, flashing, gutters, and trim, are sold or measured by the linear foot. Understanding how to measure and calculate linear feet correctly can help ensure you purchase the correct amount of materials Improper measurements can lead to future roof repair issues. and complete your project without running into unexpected costs or shortages.These calculations are a key part of any roofing project.
Tools You Need to Calculate Linear Feet
Before you start calculating linear feet for your roofing project, you’ll need to gather the necessary tools. The right tools will help you get accurate measurements, saving you time, effort, and money. Here’s a list of the most common tools you’ll need:
- Tape Measure: A sturdy, retractable tape measure is essential for measuring linear feet. It should be long enough to cover large areas (e.g., 25 feet or more) but also flexible for smaller tasks.
- Ruler or Yardstick: For smaller measurements, a ruler or yardstick can be helpful. It provides a quick way to measure shorter distances accurately.
- Laser Measure: A laser measure can make quick work of longer distances and is incredibly accurate. It’s especially useful for larger roofs or for measuring from a distance, such as when working with steep pitches.
- Chalk Line: A chalk line is used to mark straight lines along the roof, helping you stay consistent when measuring for materials like shingles or metal panels.
- Level: To ensure that your measurements are straight and accurate, a level can be used to check if a roofline or edge is even, especially on steep or complex roof designs.
- Calculator: While not strictly a physical measuring tool, a calculator will be necessary to do the math when determining linear feet for your roofing materials.
- Roofing Square: A roofing square (also known as a framing square) is helpful for measuring roof angles and ensuring your cuts and measurements align with your roof’s structure.Many homeowners rely on a professional roofing contractor for precise measurements.
How to Measure Linear Feet Correctly
The process of measuring linear feet for your roofing project depends on what you’re measuring. Whether you’re calculating the length of roof edges, the perimeter of your roof, Accurate calculations ensure a smooth roof installation.or the length of other components such as flashing or gutters, the method is relatively simple but requires attention to detail. Here’s how to measure correctly:Proper measuring techniques are critical before starting any roof installation.
1. Measure Roof Edges
To measure the linear feet of your roof edges, you’ll need to walk around the perimeter of your roof. This is where your tape measure or laser measure comes in handy. Measure from one end of the roof to the other, following the roofline closely. Ensure that you follow the exact path of the edge to get the most accurate measurement.
- Step 1: Start at one corner of the roof.
- Step 2: Measure along the roof edge in a straight line to the next corner or end of the roof.
- Step 3: Repeat this for every section of the roof edge, including gables, ridges, and eaves.
- Step 4: Add up the measurements to get the total linear feet for the entire roof.These measurements are used to create an accurate roofing estimate.
2. Measure Ridge and Eave Lengths
The ridge (the highest point of the roof) and eaves (the lower edges) also need to be measured in linear feet. Measure the length of the ridge along its entire length, from one end to the other. If there’s a hip roof, you’ll need to measure each ridge separately.
For the eaves, the process is similar. Measure from one side of the eave to the other, following the roof’s contour. Keep in mind that some roofs may have multiple eaves, which should all be measured individually.Ridge and eave calculations are essential during a roof replacement.
3. Measure Flashing and Gutter Lengths
Flashing, which helps to protect the roof from water damage, is another component that needs to be measured in linear feet. Typically, flashing is installed along the edges, chimneys, skylights, and other roof penetrations.
Similarly, gutters are often measured in linear feet. Measure along the entire length of the gutter, including any corners or downspouts, to ensure you order the correct amount of material.
4. Consider Roof Slope
The slope of the roof doesn’t directly affect the linear footage of the edges, but it can impact the amount of material you need. For example, a steeply sloped roof might require additional materials due to the increased surface area. Make sure to consider the roof pitch when calculating your material needs, especially for shingles or roofing panels.Slope plays a major role in overall roofing system performance.
Calculating Roofing Material in Linear Feet
Once you have your linear feet measurement for the roof edges, ridges, eaves, and any other components like flashing or gutters, you’ll need to use these measurements to calculate the amount of material you need. Different roofing materials are typically measured and sold in linear feet, and calculating the right amount is critical for keeping your project on track.This step is essential for planning a successful roofing project.
1. Shingles
Shingles are commonly measured in bundles or squares (a square covers 100 square feet). However, you can still estimate the linear footage of shingles you need by knowing how many shingles are required per linear foot of the roof edge.
- Step 1: Determine the coverage of the shingles. For example, if one bundle of shingles covers 33.3 square feet, divide the coverage by the number of linear feet.
- Step 2: Multiply the total linear feet of your roof edges by the number of shingles required per foot. This will give you the amount of shingles you’ll need for the perimeter.
2. Gutters
Gutters are generally measured in linear feet. You’ll want to add up the total linear feet of all the gutters on your roof (including corners and downspouts) and then purchase gutters based on this total.Gutter measurements are often included in a full roof replacement plan.
3. Flashing
Flashing is typically sold in 10-foot sections. You’ll need to measure all the areas where flashing will be installed (around chimneys, skylights, vents, etc.) and calculate how many sections are required for the total linear footage.Flashing errors are a common cause of roof repair problems.
4. Roofing Trim and Fascia
Roofing trim and fascia boards are often purchased by the linear foot. After measuring the perimeter of your roof, including the eaves and ridge, you can estimate the amount of trim or fascia you need.Fascia and trim are important parts of your roofing system.
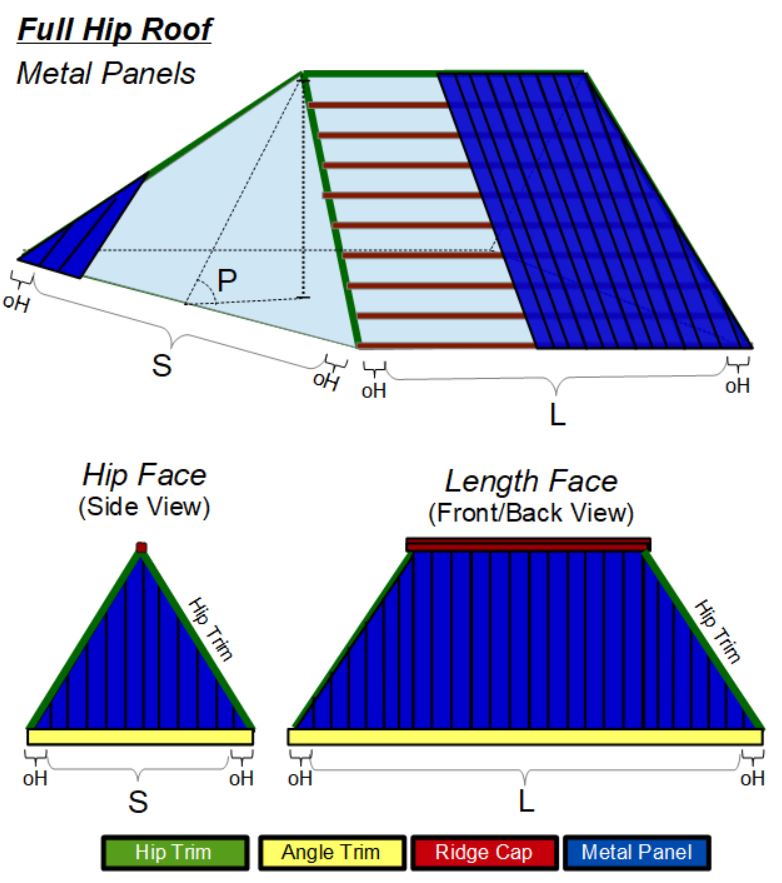
5. Metal Roofing Panels
Metal roofing panels are often sold in sheets of a certain length. Measure the linear feet of the roof, and then determine how many panels will be required based on their length. For example, if each panel is 10 feet long, you’ll need to calculate how many panels fit along the total length of your roof.Metal systems require precise measurements for proper roof installation.
Why Accurate Calculation Matters
Accurate calculation of linear feet for your roofing project is essential for several reasons:
- Cost Efficiency: Overestimating the amount of material you need can lead to unnecessary costs, while underestimating can result in shortages and delays. Accurate measurements help ensure you only buy what you need, avoiding waste or extra expenses.
- Avoiding Material Shortages: If you miscalculate the linear footage, you may run out of material mid-project, causing costly delays and requiring additional orders that could take time to ship.
- Ensuring Proper Fit: Roofing materials are designed to fit together in specific ways. Accurate linear footage ensures the materials align properly, which is especially important for shingles, flashing, and trim pieces that need to fit snugly along roof edges.
- Project Timeline: Accurate calculations also help keep your project on schedule. Knowing exactly how much material you need allows you to plan your roofing installation more efficiently, ensuring you complete the job without delays.Planning ahead helps streamline your entire roofing project.
- Professional Results: Whether you’re a DIY homeowner or a contractor, accurate measurements are essential for a professional-looking roof. Properly calculated materials result in a smooth, visually appealing roof that performs well.
Inaccurate measurements can lead to costly roof repair or delays.
Conclusion
Understanding how to calculate linear feet for your roofing project is a critical skill that ensures accuracy, efficiency, and cost-effectiveness. Whether you’re measuring the length of roof edges, ridges, eaves, or purchasing materials like shingles, gutters, and flashing, knowing how to calculate linear feet properly will help you avoid mistakes and deliver a high-quality roof. By using the right tools and following these tips, you’ll be well on your way to mastering linear foot calculations and making your roofing project a success. If you want accurate measurements and a stress-free experience, request a professional roof estimate today.
At S&K Construction And Remodeling LLC, we pride ourselves on providing top-notch roofing services to residents in Northeast Ohio. Our expertise in accurate measurements and roofing material calculation ensures that your project will be completed smoothly and efficiently. If you’re ready to start your roofing project or need assistance with measuring and calculating materials, reach out to us today for professional advice and service!
Call now to schedule your roof installation or roof replacement.