What Is The Proper Order Of Roof Installation? A Complete Step-By-Step Guide
When it comes to roof installation, understanding the proper order of the steps involved can make a huge difference in the quality and longevity of your roof. Whether you’re replacing an old roof or installing a new one, following the right sequence is crucial to ensure your home stays protected against the elements.
In this comprehensive guide, we’ll walk you through the proper order of roof installation, covering everything from preparation and tear-off to final inspections. Plus, if you’re in Northeast Ohio, including Ashtabula County and surrounding areas like Jefferson, you’ll learn why choosing a trusted roofing contractor like S&K Construction And Remodeling LLC can make your roofing project smooth and worry-free.
Why Does the Order of Roof Installation Matter?
Roof installation isn’t just about slapping shingles on a roof deck. It’s a detailed, multi-step process that involves removing the old roof, preparing the structure, installing protective layers, and finishing with shingles or other roofing materials. Each step builds on the previous one to create a weatherproof, durable roof.
Skipping or reordering steps can lead to leaks, poor ventilation, shortened roof lifespan, and costly repairs. Proper order also ensures warranty coverage, code compliance, and overall home safety.
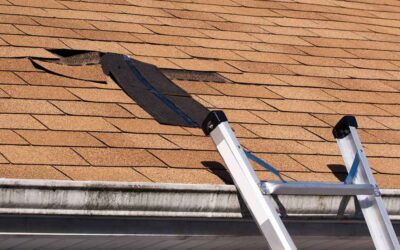
Step 1: Inspection and Roof Assessment
Before any roof installation begins, a thorough roof inspection and assessment must be completed. This step helps identify:
- Existing damage or structural issues
- Presence of mold, rot, or pests
- Condition of roof decking and sheathing
- Type of roofing material previously used
- Local building codes and permits required
Professional roofing contractors, like those at S&K Construction And Remodeling LLC, conduct this assessment carefully to recommend the best approach and materials for your roofing project.
Step 2: Tear-Off or Roof Overlay Decision
Once the inspection is complete, you must decide whether to do a full tear-off or a roof overlay (also called “roof over roof”).
- Tear-off involves removing all old roofing materials down to the roof deck.
- Roof overlay means installing new shingles over existing layers.
Although overlays save time and money initially, they come with drawbacks like increased roof weight, voided warranties, and difficulty spotting hidden damage. Most professionals recommend a full tear-off for long-term durability.
Step 3: Safety Preparations and Setup
Roofing is a dangerous job that requires strict safety measures:
- Setting up scaffolding or ladders securely
- Installing guardrails or harness systems
- Clearing the worksite of obstacles
- Protecting landscaping and exterior surfaces with tarps
This step also includes notifying neighbors if necessary, and ensuring workers have proper PPE (personal protective equipment).
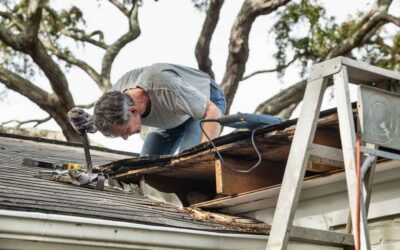
Step 4: Tear-Off of Old Roofing Materials
If a tear-off is required, roofing crews will remove the old shingles, underlayment, flashing, and other materials. This step usually involves:
- Using roofing tear-off tools such as shingle removers and roofing shovels
- Removing nails, staples, and debris
- Inspecting the roof decking for damage and replacing rotten or weakened sections
This step is crucial for creating a clean, stable base for the new roof.
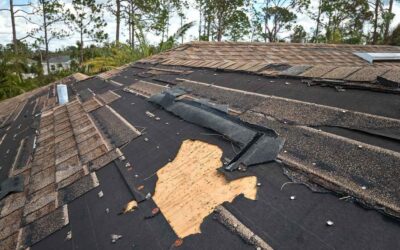
Step 5: Roof Deck Inspection and Repairs
After tear-off, the roof deck — usually plywood or oriented strand board (OSB) — must be thoroughly inspected. Damaged decking can cause:
- Structural weakness
- Water intrusion
- Shingle failure
Replacing damaged boards and reinforcing the deck helps create a solid foundation. This repair is often included in the roofing contractor’s quote but should be clarified beforehand.
Step 6: Installation of Ice and Water Shield
An essential waterproofing step, especially in colder climates like Ohio, is installing an ice and water shield membrane.
- Applied along roof edges, valleys, eaves, and around penetrations
- Prevents water intrusion from ice dams and heavy rain
- Self-adhering, durable, and flexible material
This layer protects the vulnerable parts of your roof where water is likely to accumulate or seep in.
Step 7: Installing Roof Underlayment
Next comes the roof underlayment, which is a protective barrier between the roof deck and shingles. There are two main types:
- Felt underlayment: Traditional, made of asphalt-saturated felt
- Synthetic underlayment: More durable, lightweight, and resistant to tearing
Underlayment provides secondary waterproofing, reduces the risk of leaks, and can improve fire resistance. It’s installed over the entire roof deck, overlapping seams for full coverage.
Step 8: Flashing Installation
Roof flashing is metal (usually aluminum or galvanized steel) installed around roof features like:
- Chimneys
- Skylights
- Roof vents
- Valleys
- Wall intersections
Flashing directs water away from these penetrations and joints to prevent leaks. Proper flashing installation is a hallmark of professional roofing and significantly impacts roof durability.
Step 9: Drip Edge Installation
Drip edges are metal strips installed along the roof edges and eaves to:
- Direct water into gutters and away from fascia and soffits
- Protect the roof deck edges from water damage
- Provide a clean edge for underlayment and shingles
They are installed over the underlayment along the eaves, and under the underlayment along the rakes (the sloping edges of the roof).
Step 10: Installing Starter Shingles
Before the main shingles go on, starter shingles are applied along the eaves and rakes. Starter strips:
- Provide extra protection against wind uplift
- Ensure the first row of shingles seals properly
- Create a straight edge for shingle installation
They are often cut from regular shingles or come as pre-made strips.
Step 11: Shingle Installation
The heart of the roof installation is the shingle installation itself. Whether using asphalt shingles, architectural shingles, metal panels, or other materials, this step requires:
- Starting at the bottom edge and working upward
- Staggering shingles to avoid seams lining up
- Securing each shingle with nails or clips per manufacturer specs
- Ensuring proper overlap and alignment
For asphalt shingles, wind and fire ratings, as well as local building codes, dictate installation techniques.
Step 12: Ridge Cap Installation
After shingles cover the roof field, ridge cap shingles are installed along the roof’s ridges and hips. Ridge caps:
- Seal the roof peak against water penetration
- Allow for ventilation in ridge vent systems
- Provide a finished, aesthetic look
They’re usually cut from the same shingles or specialized ridge cap products.
Step 13: Installing Roof Vents and Ventilation Systems
Proper roof ventilation is critical for preventing moisture buildup and controlling attic temperature. Common systems include:
- Ridge vents (continuous along roof peaks)
- Soffit vents (under eaves)
- Gable vents
- Roof turbines or powered vents
Ventilation installation depends on the roofing design and local climate. It should always be part of the roofing contractor’s plan.
Step 14: Gutters and Downspouts Installation (Optional But Recommended)
While not technically part of the roof installation, gutters and downspouts are important for directing water away from the foundation. Many roofing contractors offer:
- Seamless gutter installation
- Gutter guards to reduce debris buildup
- Downspout extensions and splash blocks
Proper drainage extends your roof’s lifespan and protects your home’s foundation.
Step 15: Final Cleanup and Inspection
Once the roof is fully installed, the job isn’t over. A thorough cleanup removes:
- Nails and debris from the yard and landscaping
- Leftover materials and packaging
Then, the roofing crew performs a final inspection to ensure:
- All shingles are secured properly
- Flashing and vents are sealed
- No gaps or exposed nails are present
- The roof is clean and presentable
Professional roofing companies, like S&K Construction And Remodeling LLC, pride themselves on leaving the site spotless and ensuring customer satisfaction.
Step 16: Customer Walkthrough and Warranty Information
Finally, your roofing contractor should conduct a walkthrough with you, explaining:
- What was done
- How to maintain your new roof
- Warranty details for materials and workmanship
- Who to contact if you notice issues
This transparency builds trust and provides peace of mind.
Why Choose S&K Construction And Remodeling LLC for Your Roof Installation?
Located in Jefferson, Ohio, S&K Construction And Remodeling LLC is a trusted roofing contractor serving Ashtabula County and Northeast Ohio. As an Owens Corning Preferred Contractor, they guarantee:
- Expert craftsmanship
- Use of high-quality materials
- Transparent pricing and financing options
- Comprehensive roof installation services
With hundreds of 5-star reviews on Google, S&K Construction has built a reputation for professionalism, reliability, and exceptional customer service. They handle everything from roof inspections to full tear-offs and new roof installations, ensuring your project runs smoothly from start to finish.
Common FAQs About Roof Installation Order
Q: Can I install a new roof over old shingles?
A: While it’s possible, it’s generally not recommended. Overlays add extra weight, hide potential deck damage, and often void manufacturer warranties.
Q: How long does a roof installation take?
A: Most residential roofs take 1–3 days depending on size, complexity, and weather conditions.
Q: Do I need a permit for roof installation?
A: Usually yes, especially for full tear-offs. Your roofing contractor typically handles permit acquisition.
Q: What happens if the weather interrupts the roofing process?
A: Professional roofers will secure the site and protect exposed areas to prevent damage during delays.
Conclusion
Understanding the proper order of roof installation helps you make informed decisions and ensures your roof protects your home for decades. From inspection and tear-off to underlayment, flashing, shingle installation, and final cleanup, each step is vital.
If you’re in Northeast Ohio, including Ashtabula County, Jefferson, and surrounding areas, partnering with a trusted, local roofing company like S&K Construction And Remodeling LLC guarantees quality work, honest service, and peace of mind.
Ready to get started on your roofing project? Contact S&K Construction today for a free consultation and experience the difference of a professional, reliable roofing contractor.